Silos are the top-level containers for users, projects, and resources, ensuring strict tenancy separation. Users can only see resources in their own silo. Each silo has its own resource limits and access policies as well as its own subdomain for the web console and API. You can choose to set up one or multiple silos depending on your organization’s resource and access management policies.
Rack administrators and users are typically onboarded into silos via identity provider (IdP) integration. Silos can also be configured to have rack-local accounts, which authenticate with username and password and must be created manually by silo administrators.
Recovery silo
A special silo called recovery is created during rack setup. The silo hosts a system account which is also named recovery. This built-in account has the fleet admin role that allows the operator to create user-defined silos and grant the fleet admin privilege to other users. After the rack setup process, the recovery silo will only be used for rescue purposes such as remediating identity provider integration configuration problems.
Silos versus projects as tenants
Both silos and projects can be used as the abstraction for tenants. While projects provide some separation between different application workloads, when the tenant is in an entirely different security domain (e.g., a subsidiary or a third-party company), it may be more appropriate to give them their own silo so they are fully isolated.
Preparations for silo setup
Generate a TLS certificate
A TLS certificate is required during silo setup and will be used for TLS termination on the silo-specific UI/API DNS name. The certificate’s DNS SAN can either be the silo’s fully-qualified domain name (FQDN):
$SILO_NAME.sys.$OXIDE_DOMAIN_NAMEor a wildcard domain name:
*.sys.$OXIDE_DOMAIN_NAMEFor production deployments, use a certificate from a trusted Certificate Authority (CA). For testing or development, a self-signed certificate may be sufficient.
Option 1: Using OpenSSL
For a quick, self-signed setup:
Create a directory for your certificate files:
mkdir ~/silo-certs
cd ~/silo-certs
Create an OpenSSL configuration file (
san.cnf) with the required Subject Alternative Names (SANs). Replacesilo1.sys.example.comwith your silo’s actual FQDN:san.cnf[req]
default_bits = 2048
distinguished_name = req_distinguished_name
req_extensions = req_ext
x509_extensions = v3_req
prompt = no
[req_distinguished_name]
countryName = US
stateOrProvinceName = N/A
localityName = N/A
organizationName = Self-signed certificate
commonName = silo1.sys.example.com
[req_ext]
subjectAltName = @alt_names
[v3_req]
subjectAltName = @alt_names
[alt_names]
DNS.1 = silo1.sys.example.comGenerate the self-signed certificate:
openssl req -x509 -nodes -days 365 -newkey rsa:2048 -keyout key.pem -out cert.pem -config san.cnfVerify the generated certificate:
openssl x509 -in cert.pem -text -noout
Option 2: Using Let’s Encrypt and Certbot
For deployments with a public domain and IP, Let’s Encrypt provides free TLS certificates. This requires that the domain is publicly accessible and that you can use either HTTP or DNS challenges, so this will not work for internal-only deployments.
Certbot is a tool published by the EFF for obtaining and renewing TLS certificates using the ACME protocol. It is available for most major operating systems and can be installed via package manager, with detailed instructions available at Certbot Instructions.
It is possible to generate a certificate on a local machine using Certbot and then transfer it to the Oxide silo. This includes wildcard certificates, which can be useful for multiple silos under the same domain.
Install
certbot:sudo apt install certbot #Linux
brew install certbot # macOSObtain the certificate using the HTTP-01 challenge:
sudo certbot certonly --standalone -d silo1.sys.example.com
Alternatively, use the DNS-01 challenge if you control DNS:
sudo certbot certonly --manual --preferred-challenges dns -d silo1.sys.example.comThe certificates will be stored in
/. When using the certificate, reference theetc/ letsencrypt/ live/ silo1.sys.example.com/ fullchain.pemandprivkey.pemfiles in your Oxide silo configuration.
Preparing client-provided signing certificates
For some IdP integrations, operators may need to provide a client signing certificate for Oxide’s API or console authentication flows. This process involves different formatting requirements depending on the integration method:
For API or CLI IdP setup:
openssl x509 -in idp-cert.pem -outform der | base64 > idp-cert.base64
openssl rsa -in idp-key.pem -outform der -traditional | base64 > idp-key.base64
For Console IdP setup:
openssl x509 -in idp-cert.pem -outform der -out idp-cert.der
openssl rsa -in idp-key.pem -outform der -traditional -out idp-key.der
Configure identity provider
Oxide supports the use of SAML SSO authentication with third-party identity provider systems. User and group provisioning can be configured to be just-in-time (JIT) or synchronized real-time using SCIM 2.0 API. More information about the different types of authentication and authorization setup can be found in the Identity Providers guide.
Before setting up the IdP integration for a silo, you will need to identify the IdP group, role, or attribute to be used for governing memberships of the new silo and users who are designated as administrators.
Determine which IP pools to use
You may configure the new silo to have its own IP pools or use existing pools for external IP and multicast address assignment. If you choose to provide the silo with new IP pools, you will create the pools and allocate IP ranges to them prior to setting up the silo. If the new silo will be using existing pools, you may need to review the size of those IP pools and add capacity as needed.
You can find out more about IP pools in the IP Pools and Subnet Pools guide.
Setting up a silo
The procedures for setting up new silos and identity provider integration are similar to those during rack initialization. Operators who have the fleet-admin role can use the Oxide Console, API, or CLI to create a new silo and configure its resource and integration settings.
1. Create silo and upload TLS certificate
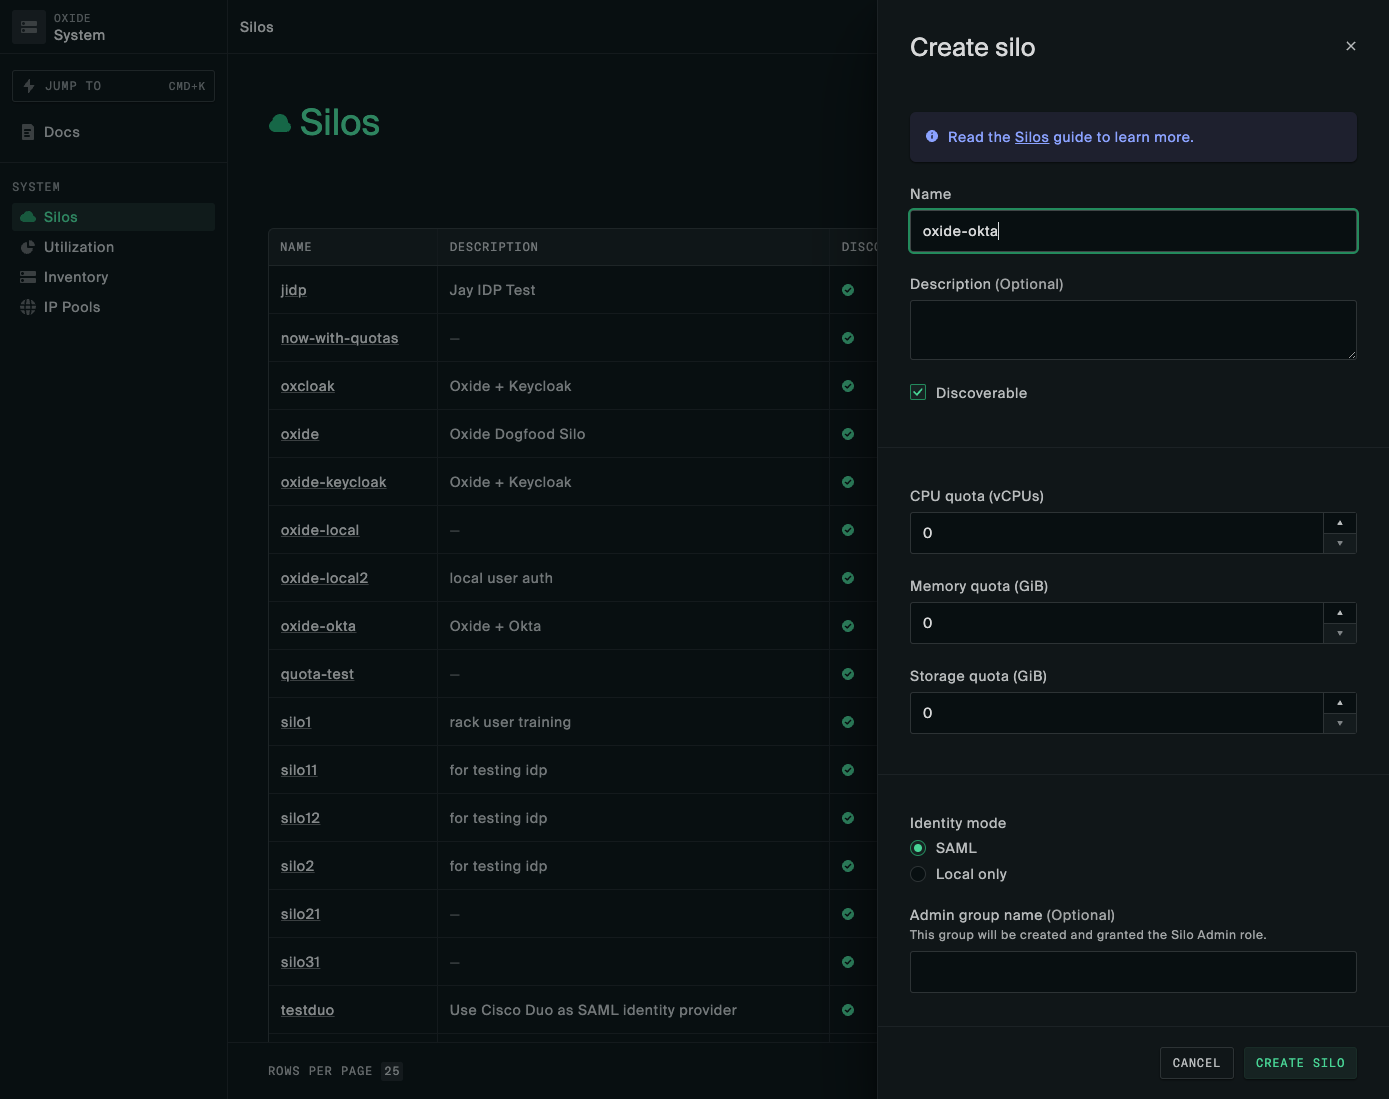
The first step of silo setup is creating the silo record and importing a matching TLS certificate. Virtual resource quotas are required during silo creation, and can be modified afterwards.
See the Resource Management guide for additional information regarding capacity planning and managing quotas.
The following information is required when creating a silo:
| attribute | value |
|---|---|
| Must start with a letter and contain only lower-case letters, numbers, and dashes. |
| A brief description of the silo context and purpose. |
| Whether the silo should be included in silo listing queries (non-discoverable silos are accessible only by direct name or id reference). |
| There are three identity modes, |
| Required if using |
| Optional mappings of fleet-level roles conferred by silo roles, applicable to the |
| Compute and storage resource limits:
|
| Initial TLS certificates to be used for the new Silo’s console and API endpoints; should be valid
for the Silo’s DNS name which follows the convention
|
Using the Oxide console
From the Oxide Console, navigate to the System menu using the dropdown at the top right-hand corner of the interface (next to your user name). On the Silos menu, click New Silo.
Using the CLI or API
The silo creation JSON payload must be provided in a file, for example silo.json. This is then
passed to the oxide silo create command:
oxide silo create --json-body silo.jsonYou can also refer directly to the documentation for the silo_create endpoint.
Two examples of the silo.json request payload are provided below. Replace
the placeholders with your actual values.
The cert and key placeholders are PEM-formatted strings, with the contents of certificate and private-key files including their headers, passed as a single-line JSON string with \n escape sequences in place of newlines. For example:
"cert": "-----BEGIN CERTIFICATE-----\nMIID...\n-----END CERTIFICATE-----"Example 1: saml_jit JSON payload
{
  "name": "$siloName",
  "description": "$siloDescription",
  "discoverable": true,
  "identity_mode": "saml_jit",
  "admin_group_name": "$idpAdminGroup",
  "mapped_fleet_roles": {
    "admin": [
      "admin"
    ]
  },
  "quotas": {
    "cpus": 18,
    "memory": 8589934592,
    "storage": 107374182400
  },
  "tls_certificates": [{
    "name": "initial-install-cert",
    "description": "Wildcard certificate",
    "service": "external_api",
    "cert": "$fullCertChainPemBlob",
    "key": "$privateKeyPemBlob"
  }]
}
Example 2: local_only JSON payload
{
  "name": "$siloName",
  "description": "$siloDescription",
  "discoverable": true,
  "identity_mode": "local_only",
  "quotas": {
    "cpus": 18,
    "memory": 8589934592,
    "storage": 107374182400
  },
  "tls_certificates": [{
    "name": "initial-install-cert",
    "description": "Wildcard certificate",
    "service": "external_api",
    "cert": "$fullCertChainPemBlob",
    "key": "$privateKeyPemBlob"
  }]
}
Authentication configuration
Local Authentication: Set identity_mode to local_only. User accounts
are managed directly within the Oxide system without an external IdP.
Follow the Local Only guide to configure
your silo for local user authentication and create the first local user.
Identity Provider (IdP) Authentication: Set identity_mode to saml_jit or saml_scim.
Users are authenticated using SAML assertions from the IdP.
Follow the Identity Providers guide to configure
your silo for IdP authentication.
2. Create identity provider (optional)
Perform this step only if your silo integrates with an external identity provider (IdP).
In this step, you’ll create the IdP configuration to integrate Oxide rack user authentication and authorization with the provider. See the Identity Providers guide for detailed specifications and integration examples.
You can verify the IdP setup by logging into the Oxide console as any of the users in the silo admin group specified in the IdP configuration. The new silo URL will be at: https:/.
3. Create silo administrator account (optional)
Perform this step only if your silo uses the local authentication mode. An example of the API requests for creating the user account and granting administrator access can be found at Create Local Users.
4. Configure access control policies (optional)
If the silo is set up for IdP integration, the admin role is automatically granted to members of the Admin group name specified during silo creation.
You may grant other access levels via the collaborator and viewer roles to other users via the Console, API, or CLI.
5. Link silo to IP pools
Each silo can be linked to one or more IP pools and one of them should be marked as the default. Only linked IP pools can be used for automatic address assignment when ephemeral or floating IPs are created for VM instances.
6. Configure access token expiration (optional)
Tokens generated for API and Console sessions are set to never expire by default. You can override the setting with the / API (the setting will be available on the Console in a future release). Token expiration is specified in the form of token lifetime or time-to-live (TTL), not a certain system time. As an example, if you make it 3600 seconds, new tokens will be set to expire one hour from their respective creation times.
Changes in TTL only take effect on tokens created after the fact. Existing tokens will still be revoked based on the original expiration dates set during creation. More enhancements will come in future releases to allow administrators to configure the TTL of Console session tokens and to expire tokens on behalf of other users.
Related API reference
The following APIs are accessible to fleet administrators only:
scim_token_* endpoints to manage SCIM tokens for their own silo, while fleet administrators can manage tokens across all silos.Silo administrator capabilities
Silo resource access
Silo administrators can access and act on all the child resources within the silo, including projects, instances, images, disks, snapshots, and VPCs. They can also modify the access policies of the projects to grant or revoke access permissions.
Silo administrators can view the capacity allocated to the silo as well as the current resources utilization on the console
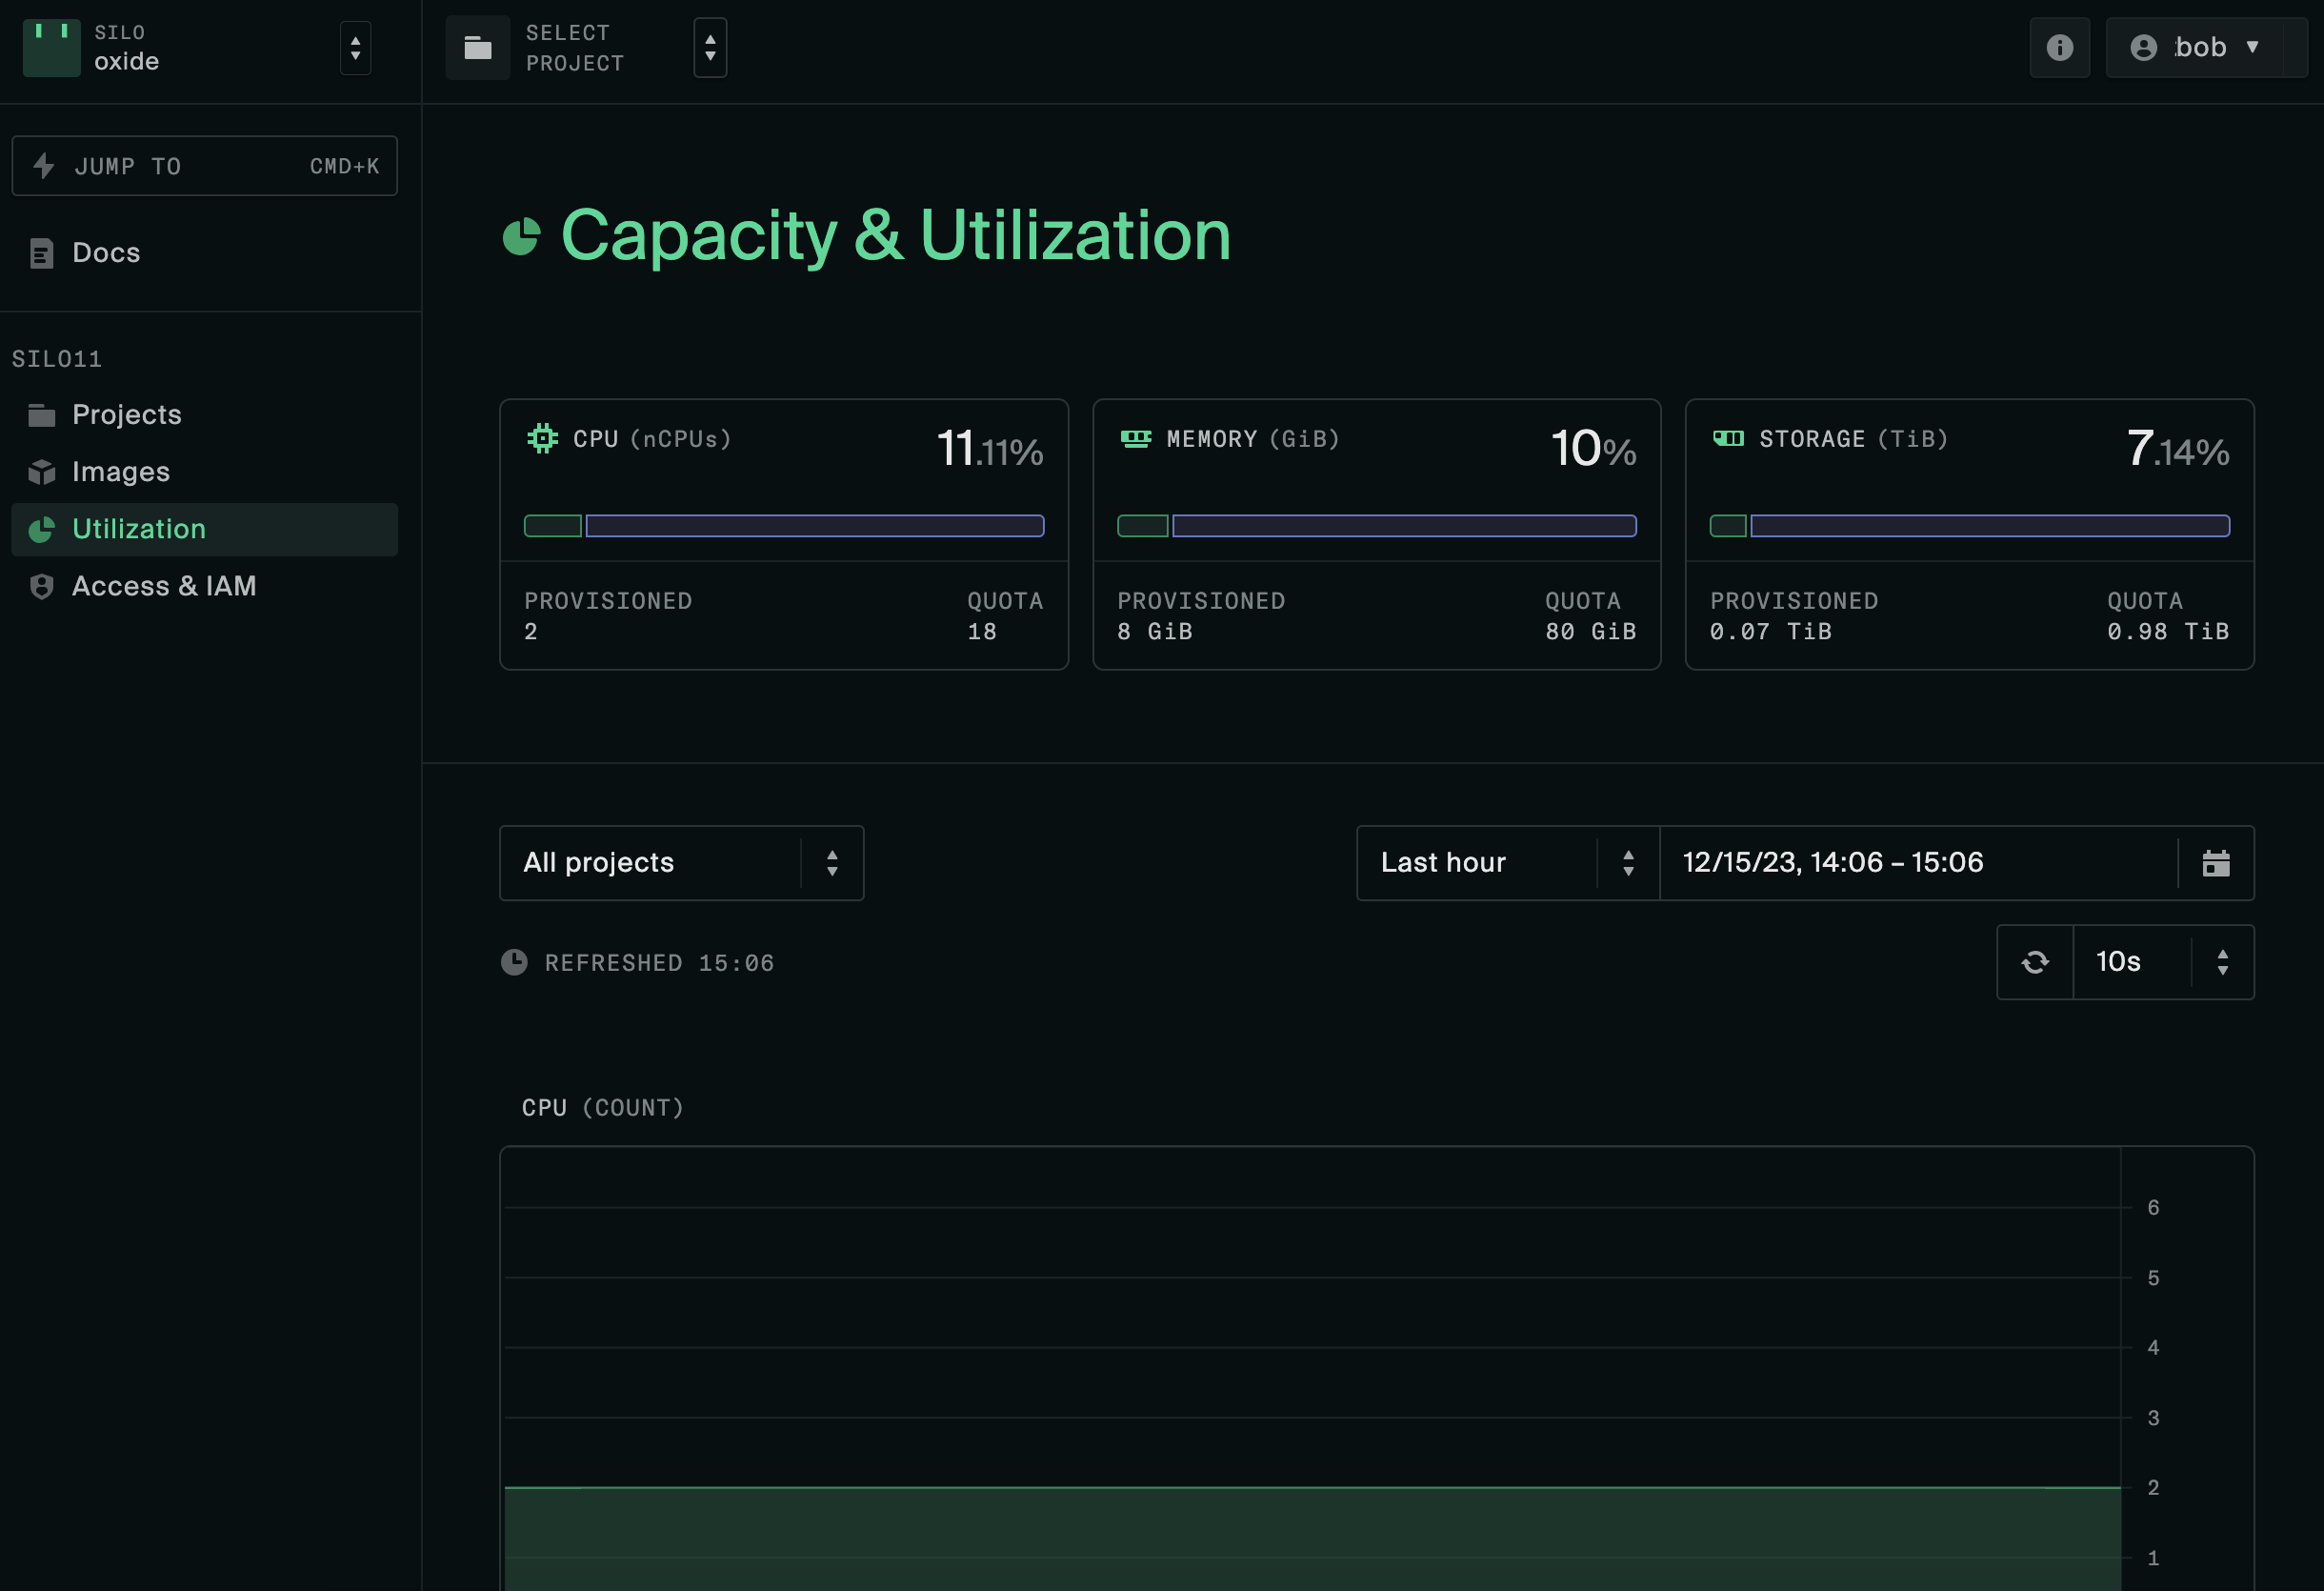
They can also see the available resources via the API:
When users attempt to provision more disks or start up more instances than permitted by the resource quotas or IP pools, they will receive an InsufficientCapacity error from the API. Silo administrators can either ask the fleet administrator to increase the resources allocated to the silo, or advise users in the silo to remove unused disks or running instances to free up compute, storage, and network resources.
Silo TLS certificate replacement
Silo administrators have the permission to manage TLS certificates for their silos.
To replace the existing TLS certificate for a silo:
If the administrator has access to more than one silo, first configure the
OXIDE_HOSTandOXIDE_TOKENenvironment variables that correspond to the target silo.Import the new certificate using certificate_create. Pass the
--insecureor-kargument if the existing certificate already expired.Remove the old certificate using certificate_delete.
sys subdomain in the DNS SAN (e.g., *.sys.$OXIDE_DOMAIN_NAME). This is
necessary because silos are created as $SILO_NAME.sys.$OXIDE_DOMAIN_NAME.Here are the API endpoints for managing TLS certificates:
Rotating silo SCIM tokens
Silo administrators have the permission to create new SCIM tokens and delete any unused ones through the Console or API.
The new token needs to be set in the SCIM app integration configurations of the identity provider before removing the existing one to avoid disrupting live user and group import.
Here are the API endpoints for managing SCIM tokens: